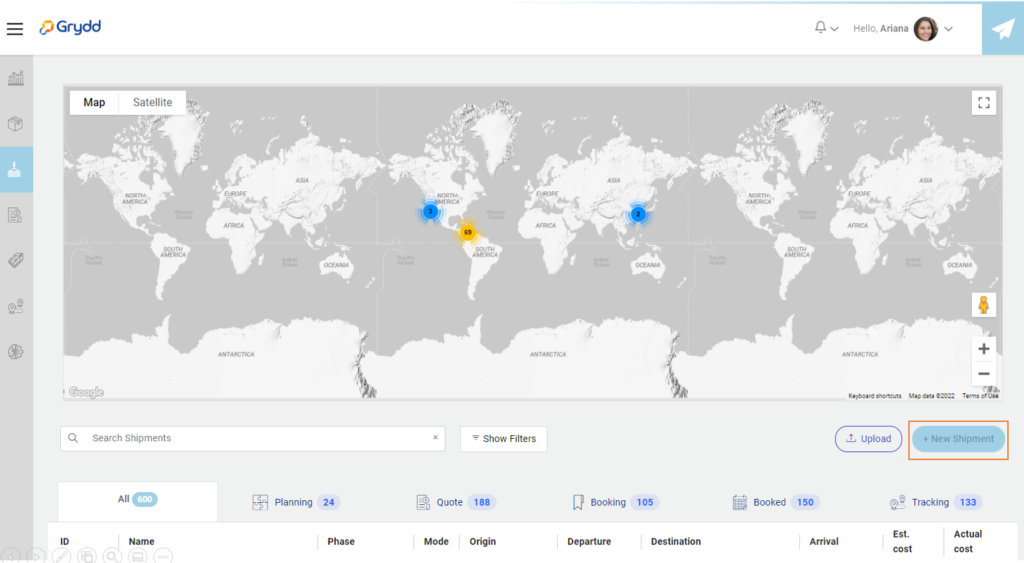
Let’s get started! Click on the button + New Shipment and the system will automatically take you to a new view.
- You will see three options to create a new shipment, select the one that says “Quick Shipment” the system will take open the next view where you will follow 3 steps.
- This option is useful when your client asks you to help them with this process.
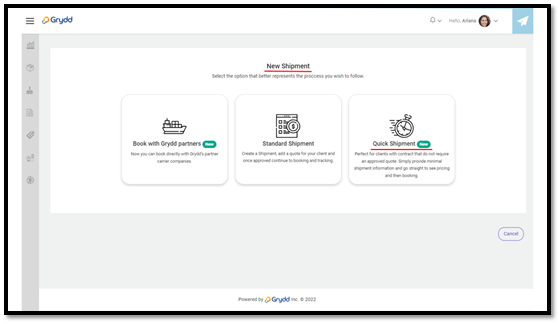
- In this view you will go through 3 steps: Shipment, Cargo and Client.
- In the first one you will add all the initial information for your shipment.
- Select one of the types of movement from the list (Door to Door, Door to Port, Port to Door, Port to Port).
- Select the date of Estimated departure, click on the calendar icon, and pick a date.
- Select an estimated arrival or choose Open Arrival Date if you are not sure about the date.
- Choose a port of origin and port of destination from the list.
- Once the system recognize that the route is international it will show the INCO Terms field, select one from the list or from the table.
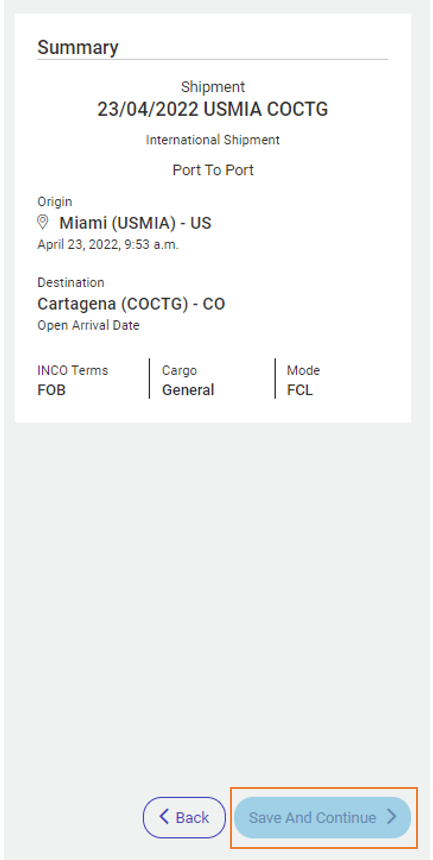
- On the right side you will see a Summary of the information you are adding.
- Select Continue to go to the next step.

- In this view, you are going to add all the information about your Cargo, giving more specific details to the system.
- Select Cargo Mode, if you choose Full Container Load the system will show you some options different than the options for the Detail Cargo.
- Choose one commodity or commodities you need from the list. A list of commodities will appear when you click on the commodities card.
- Select your Container Type and Quantity, click on the tittle at the right “+ Add”.
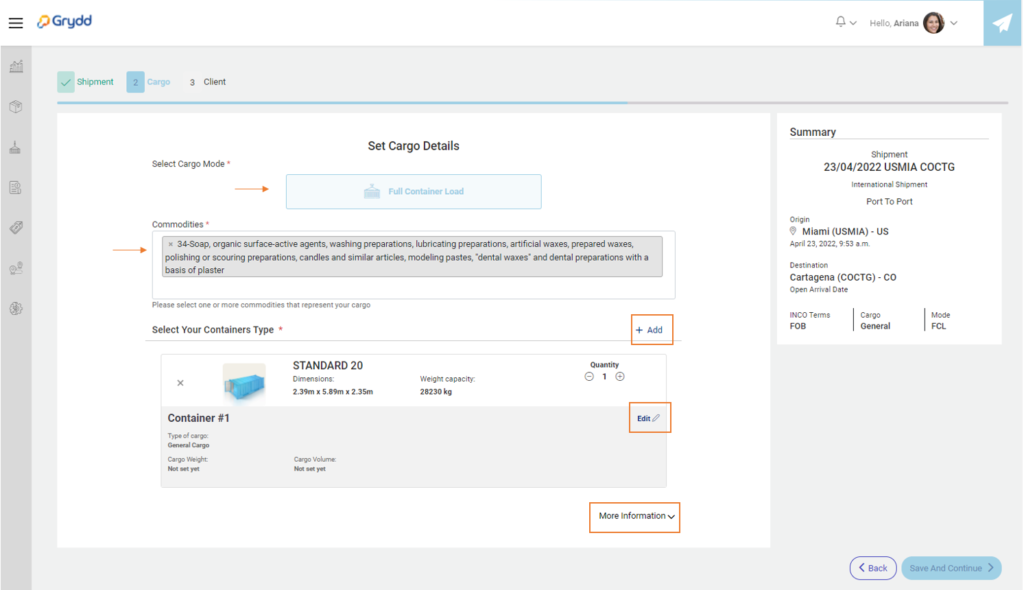
- The system will open a modal where you will be able to choose the container and then add the quantity.
- You can click on the X next to the container icon if you want to delete that container and pick a new one.
- When you finish click on the button Add containers.

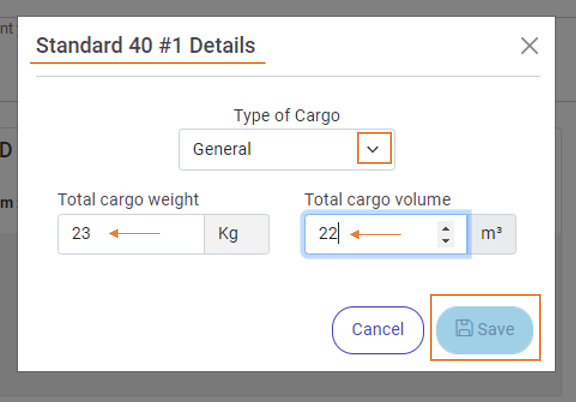
Once you chose your container or containers, you can add the weight and volume by selecting Edit.

- A new modal will open, and you can add the Total cargo weight and the Total cargo volume.
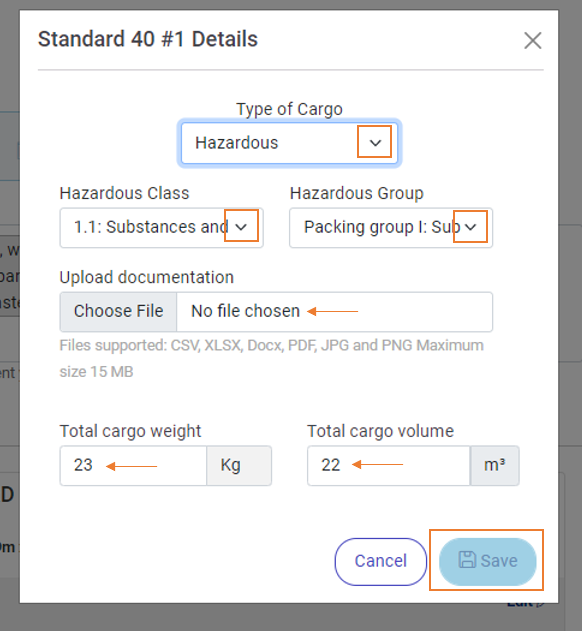
- Select if the type of cargo is general or hazardous and save.
- If is Hazardous, the system will show you new options.
- Choose a hazardous class from the list when you click on the drop-down arrow.
- Choose a hazardous group from the list when you click on the drop-down arrow.
- Upload documentation to support your choice.
- Then click on Save.
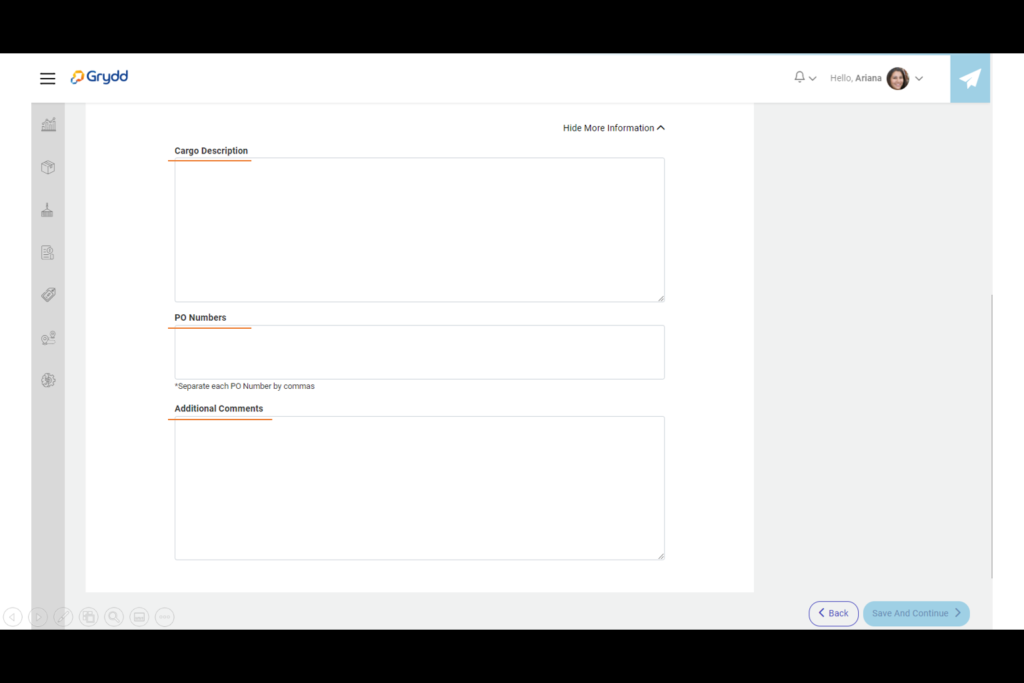
You will also see that there is a tittle “More Information” at the bottom of the view. This information is optional (Not required).
Once you have added all the details for your cargo, on Full Container Load. Click on the button “Save and Continue” to go to step 3.
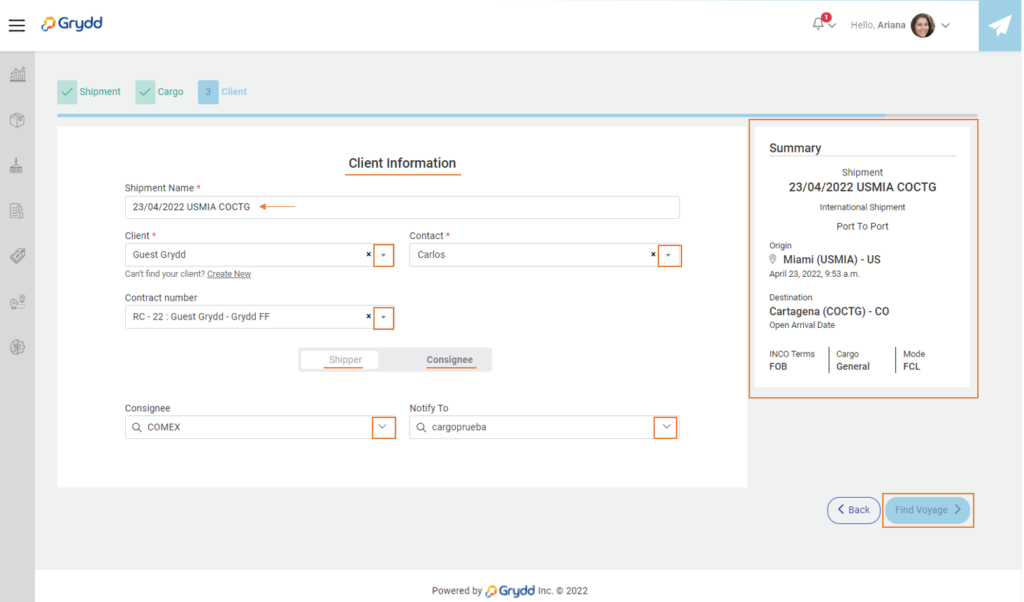
- The final step is “Client”, here you will add all the client information.
- Add a shipment name or leave the one that the system suggests.
- Choose a client from the list when you click on the drop-down arrow on the field client.
- Select a user that will be the main contact of the client’s company.
- Select a contract number that you already have with the client.
- Select on the slide bar a shipper or consignee, and then select the company from the list. And do the same to choose the company to Notify to.
- Once you have ready this information, review the summary and if everything is correct, click on the button Find Voyage to see your options in the next view
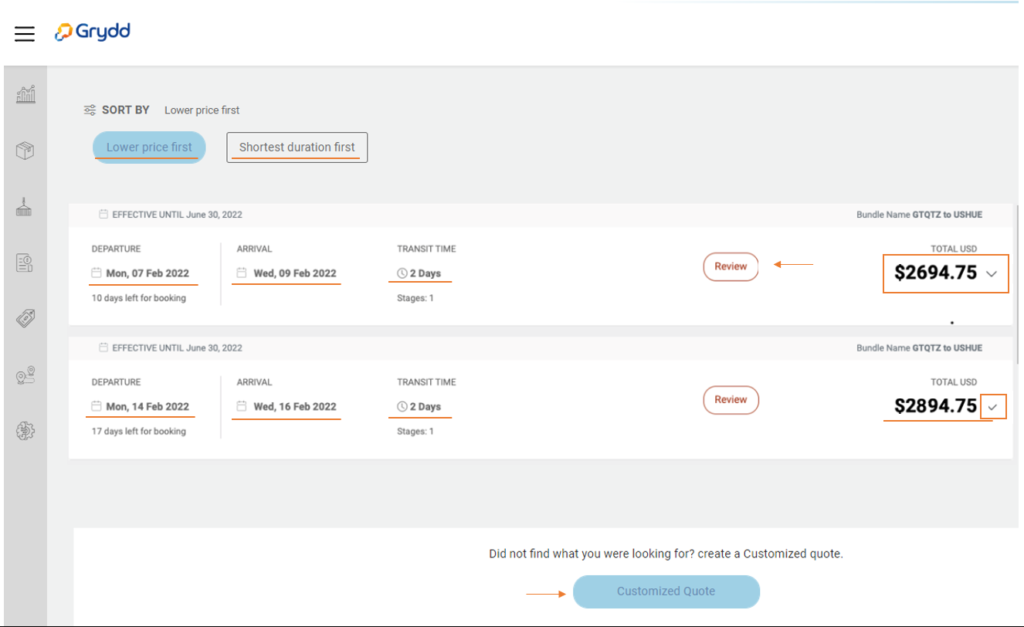
- The system will show you a list of different options for you to booking.
- You can Sort by lower price or shortest duration; these options are at the top of the view.
- It also shows until when this quote will be effective.
- You will see the departure and arrival time, and when you compare it, you can see that the date will change for the other options.
- Transit time can also change from one option to another.
- On the left you will see the total; it can change from one option to another.
- If you want to see more information, click on the drop-down arrow next to the price and it will display more details.
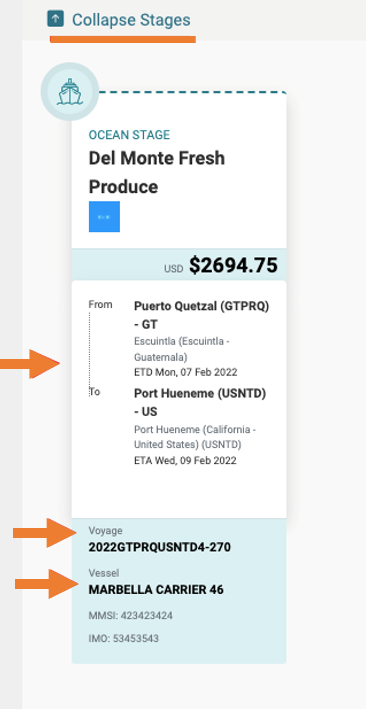
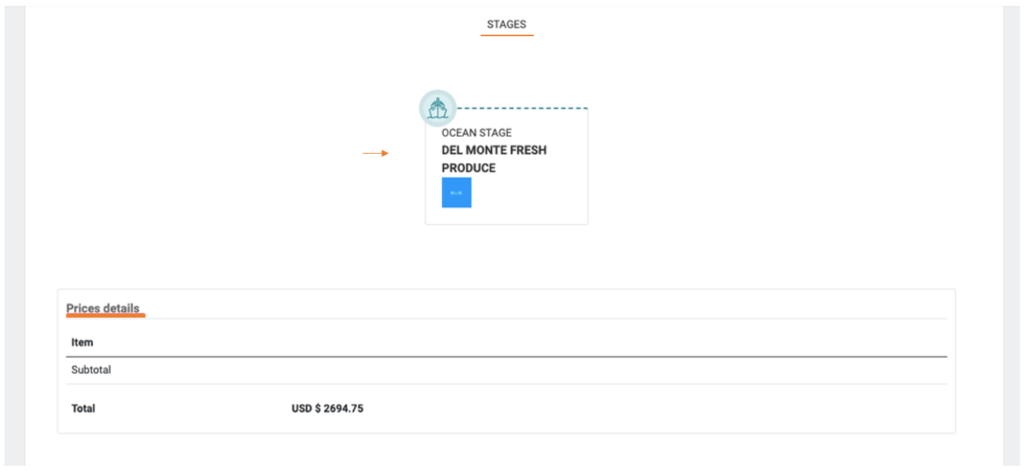
You will see the stages with the carrier information, if you want to see more details about the stage click on the title “Expand Stages”.
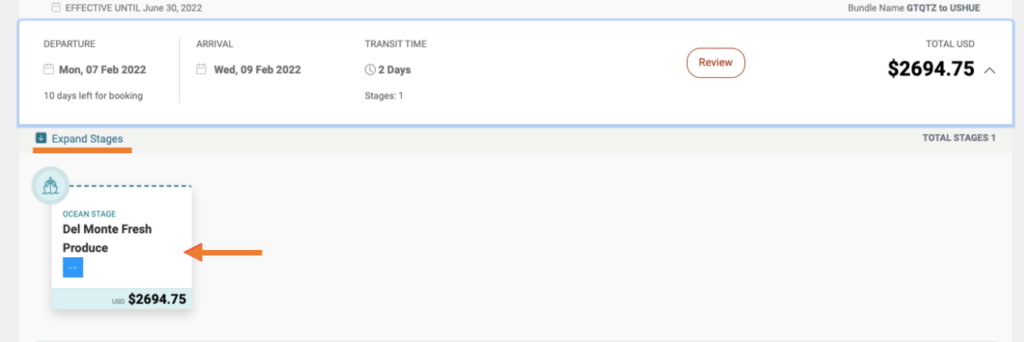
- When the card is expanded you will see the vessel’s route, and below that the Voyage and Vessel information.
- You can click on “collapse stages” to close it.
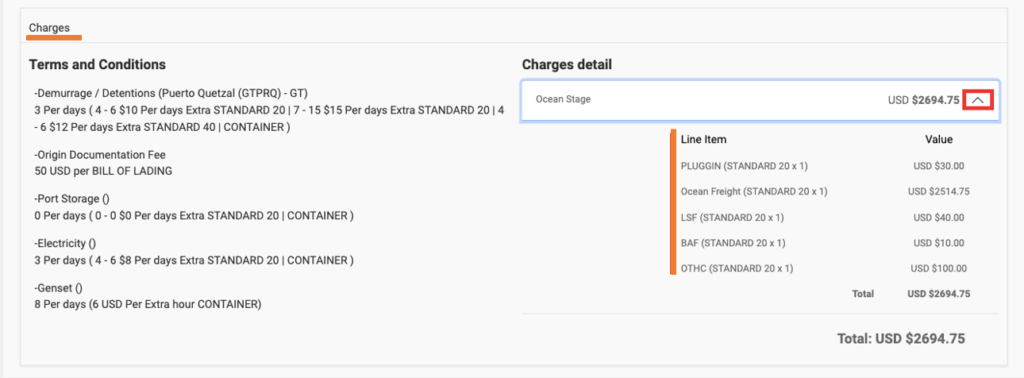
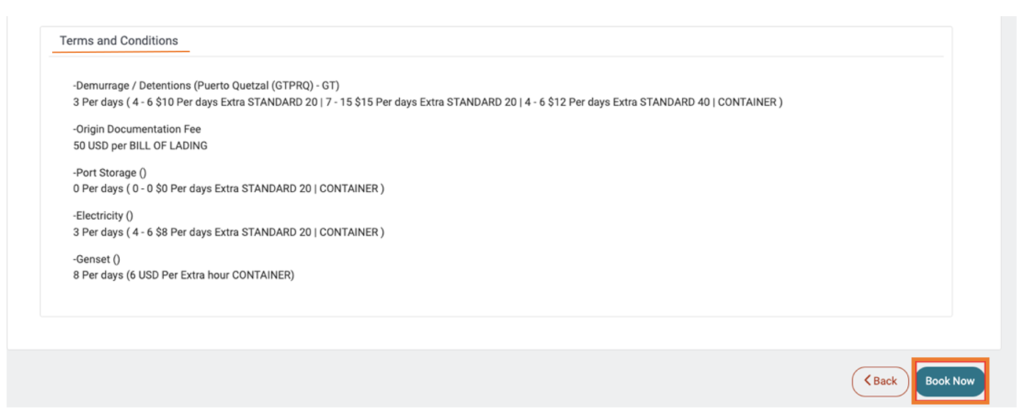
Then you will see the details of the charges. On the left side there are the terms and conditions and on the right side is the total cost, and if you click on the drop-down arrow, you will see the details of the total cost.
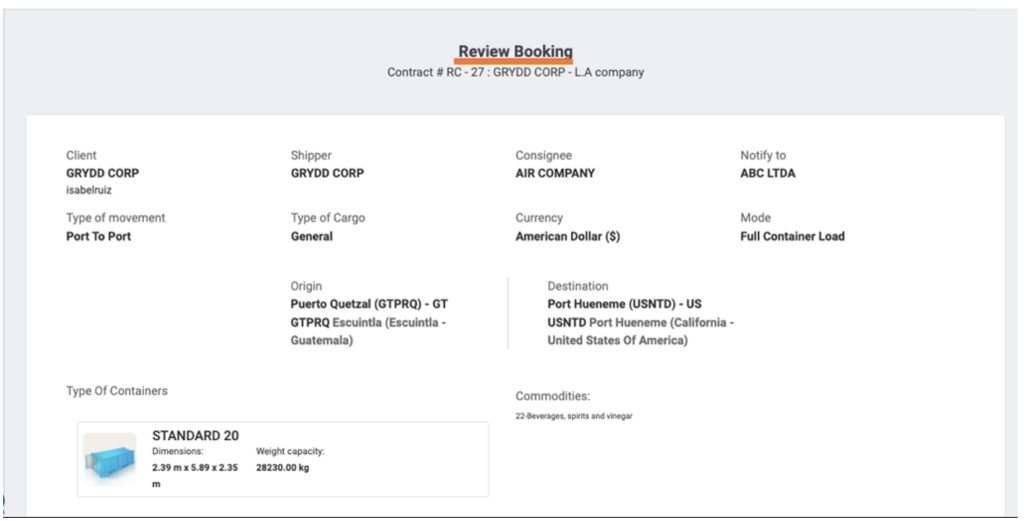
Click on the button “review” to see a full page with this all information in one place.

- The system will show you all the previous information in a new view, if you are agreeing with the information, click on the button Book now.
- When you click on “Book Now”, the system will automatically take you to the booking view.
In some cases, it could happen that the system does not find quotes, then it will show you a message suggesting where you should go to review and correct. Click on continue and it will close the message.
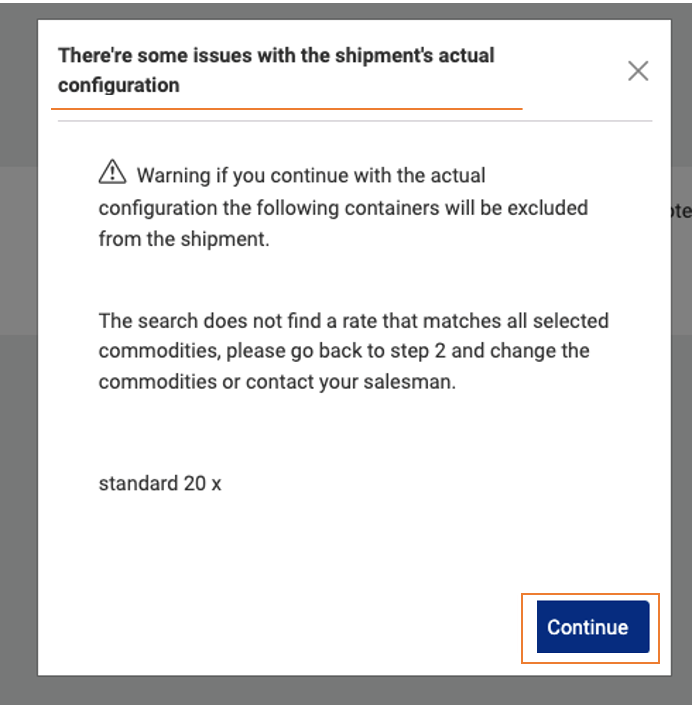
- To go to the previous view, click on the Back button and edit the information you need and try again.
- Or you can create a customized quote clicking on the button at the bottom.

Now that you have clicked on the button Book Now, a modal will appear informing you to wait a bit while your price is being booked.

The system will take you to the Booking view. Here you will find all the information of your shipment. Dates, IDs, Route, Cargo, Containers, assigned collaborator, charges, Documents, Collaborators for the whole shipment and Activity.
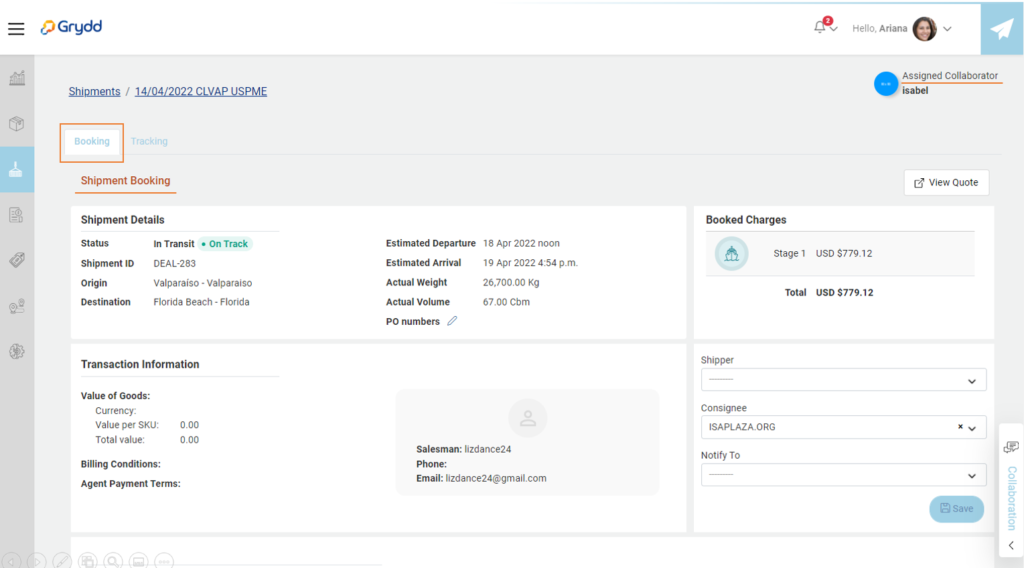
- When you get to the tittle Shipment’s Bookings, you will see a booking Id that the system generated automatically according to your configuration in settings previously.
- Then you will see a status, this status can be managed through the Carrier Management Module on the Bookings tab.
- And you will see a Booking number also generated automatically by the system.
- If you want to see more, click on the arrow on the right.

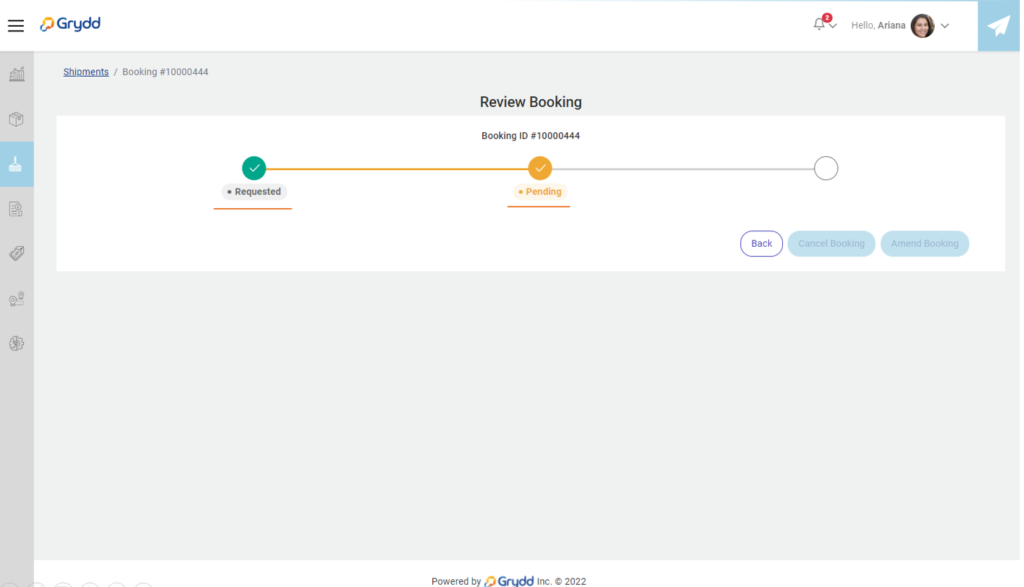
- You will see the Booking review, and in which step the process is.
- Once the Booking is completed (Through the carrier management module). The two buttons “Cancel Booking” and “Amend Booking” will be activated” and you will be able to use them.
- Now you are going to see a section where you will find a few documents, some of them are required some of them are not.
- These documents here are supposed to be add by the client. And they need to be configured for each route. The configuration for these documents is made on the organization’s settings previously. And you can add as many documents as needed.
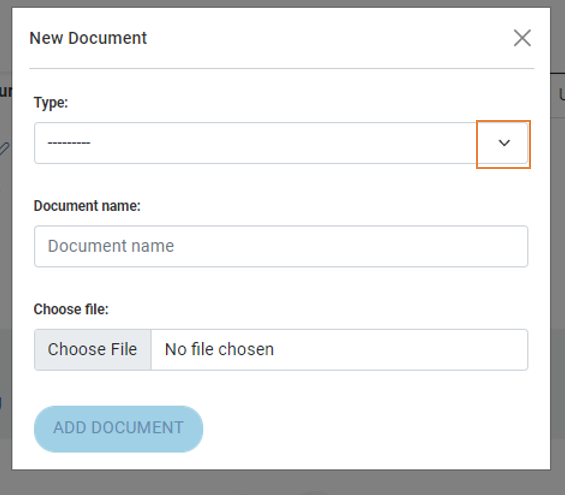
- Click on the button New Document to open the form.

Here are some examples:
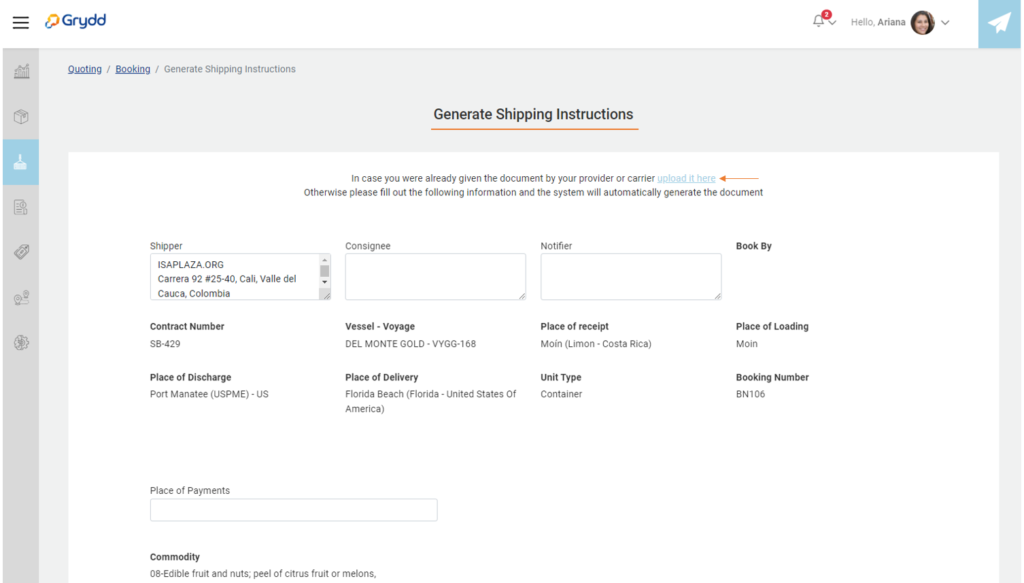
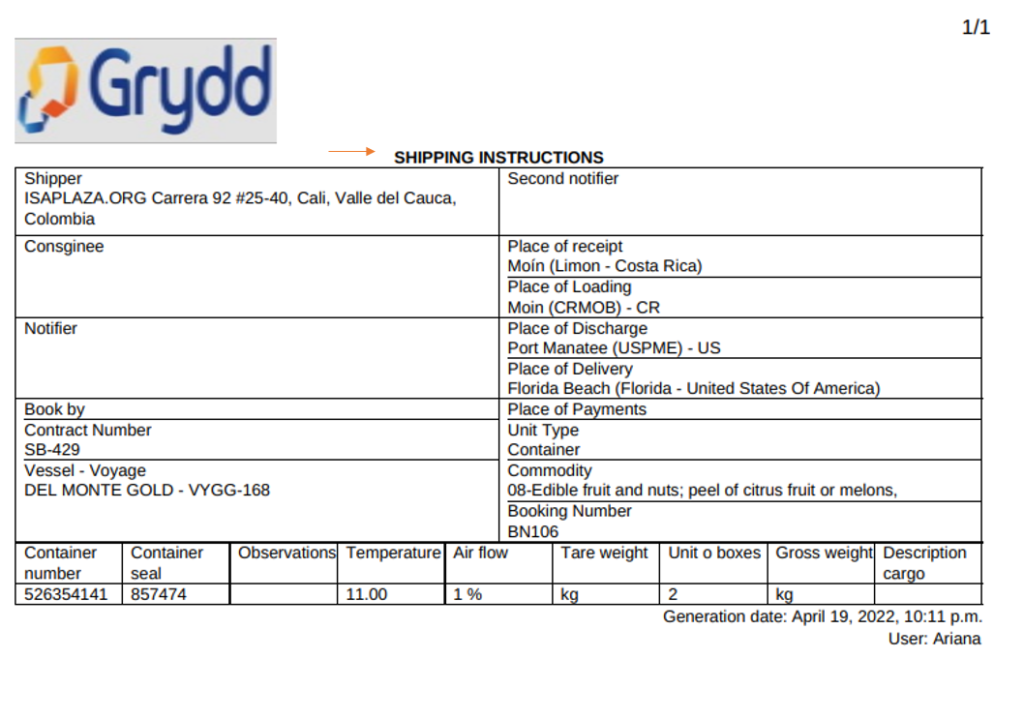
Example of Shipping Instructions:
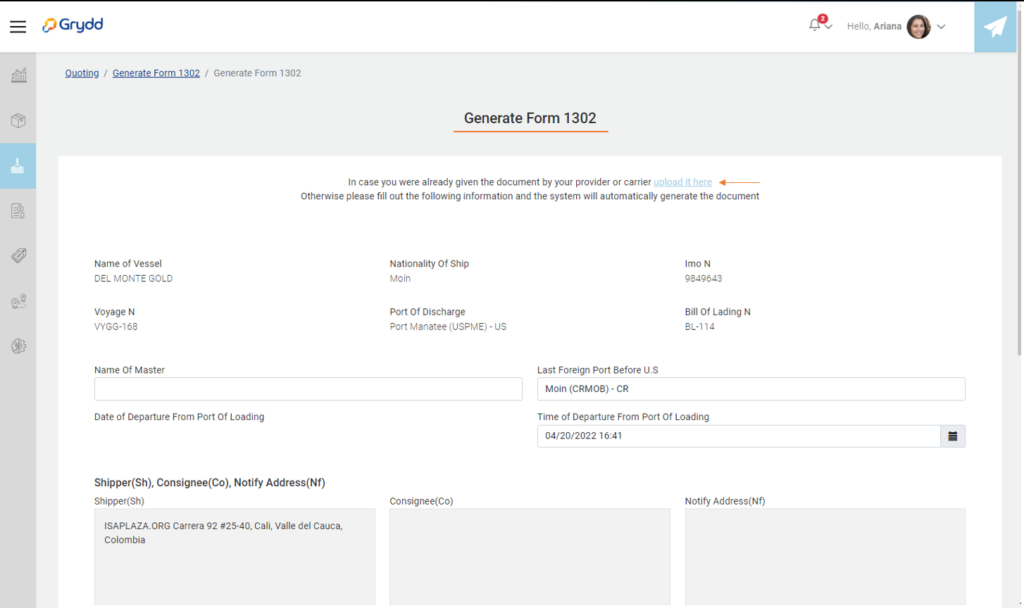
Fill the fields that are in blank and the click on “Generate”. If you already have the document, then click on the tittle “upload it here” and that is all. The document will be added immediately.
This is the form:

This is the document:
Example of Bill Of lading: This is the form

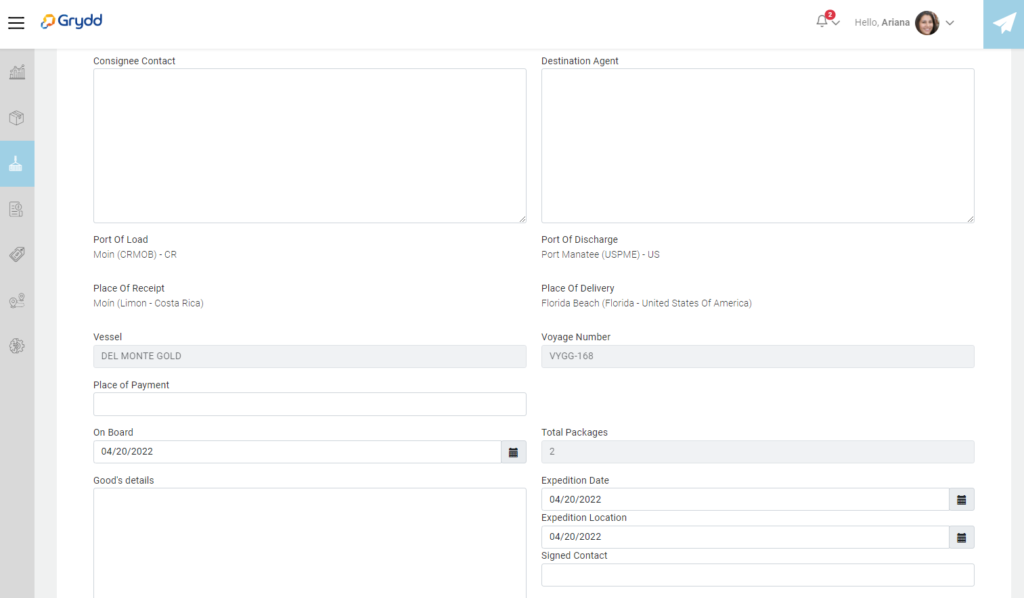

This is the document:


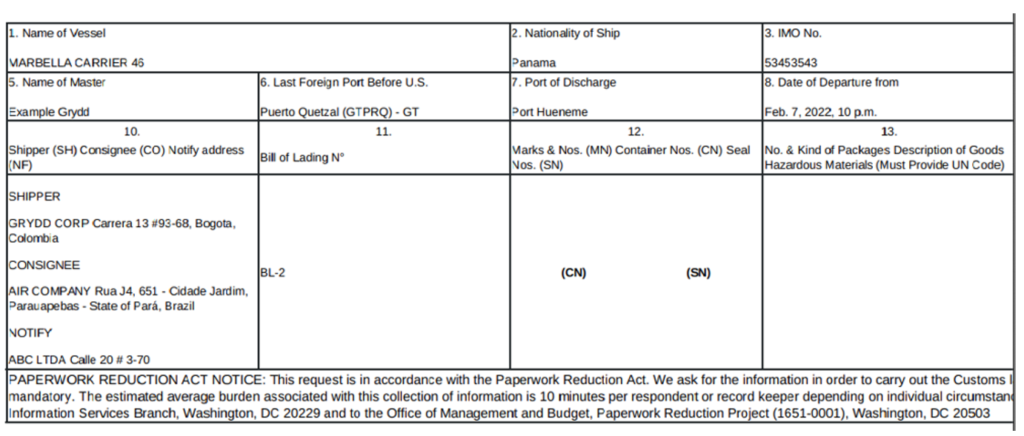
Example of 1302: This is the form
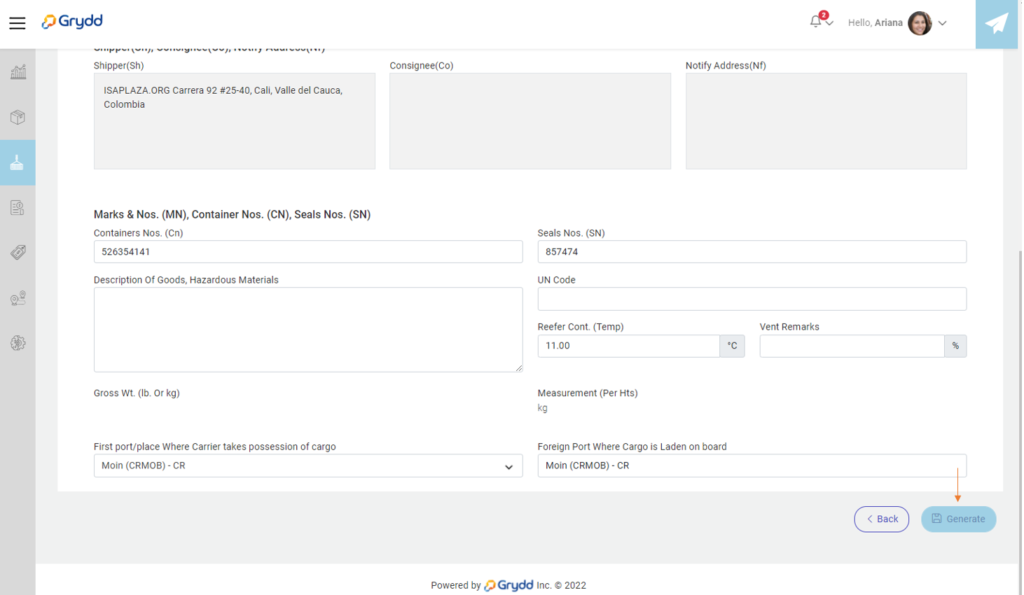
This is the document:
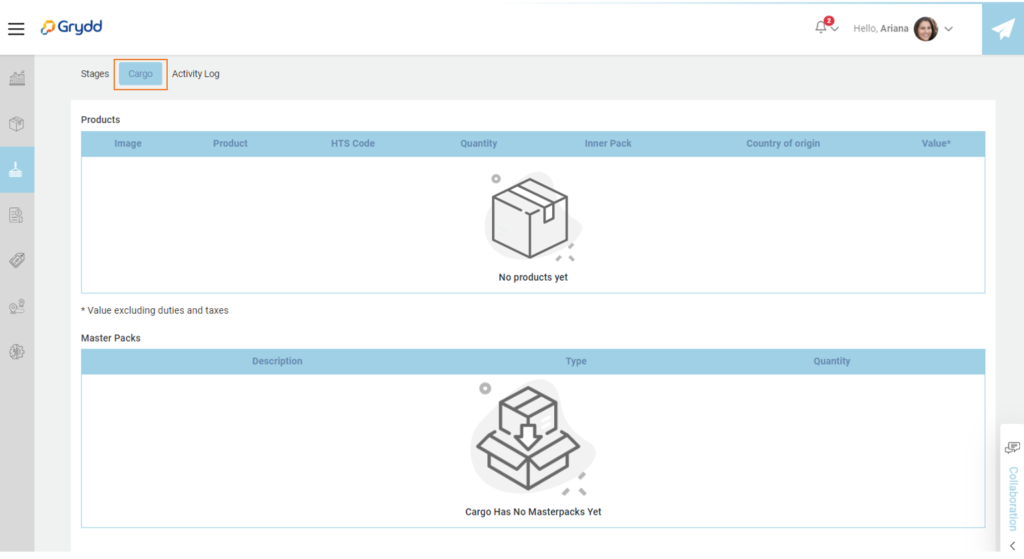
Then you will find 3 tabs: Stages, Cargo and Activity Log.
- Stages will show you all the stages your route have, with all the information about it. Dates, Transport, Addresses, Charges and Documents.
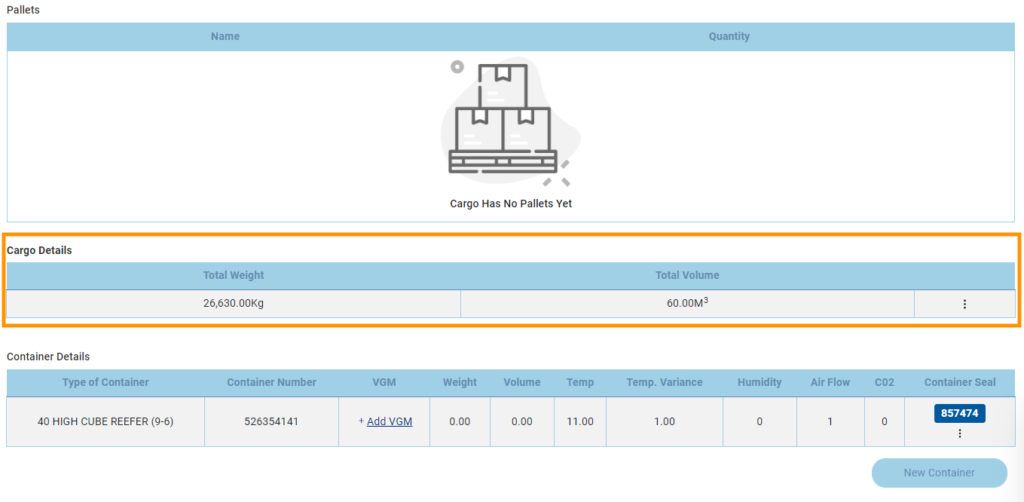
In Cargo you will see Products related with that specific shipment, Master Packs, Pallets, Cargo Details, Container Details, and the Total.
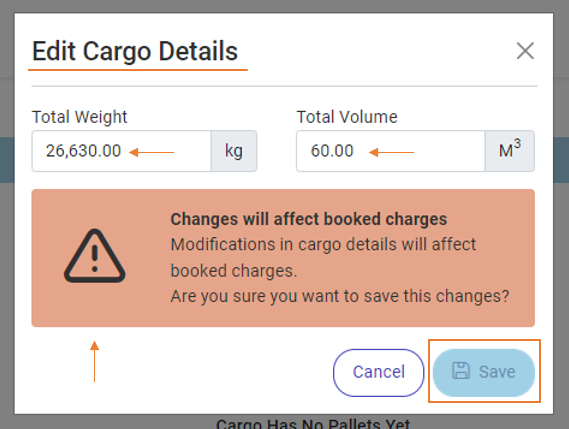
In Cargo Details, you have the option to Edit the Total weight And Total Volume.
Click on Edit Details and a modal will open. Do the changes you need and click on Save.

Do the changes you need and click on Save.
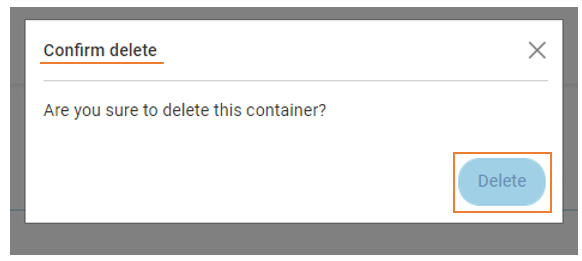
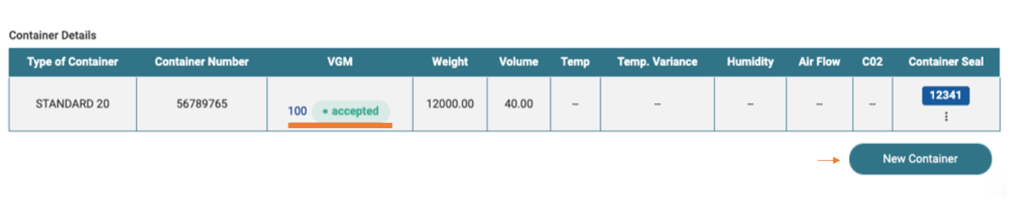
On the Container Details, you also have the option to edit and delete the information. Click on the kebab menu and choose one option.

If you select Edit, a modal will open, and you will be able to change the information and then click on Save.


If you select Delete, a modal will open for you to confirm the elimination of the container.
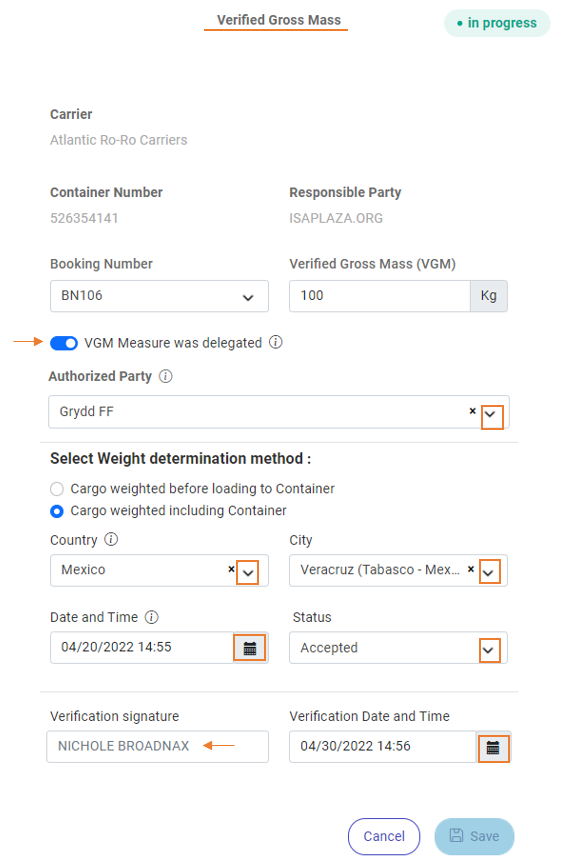
The client will have the option to add the VGM by clicking on the tittle.
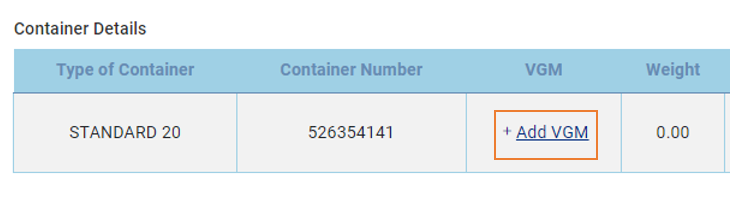
A modal will open, and they can add all the information.
And when is completed, it will look like this. You can add as many containers as you need. Clicking on the button New Container.
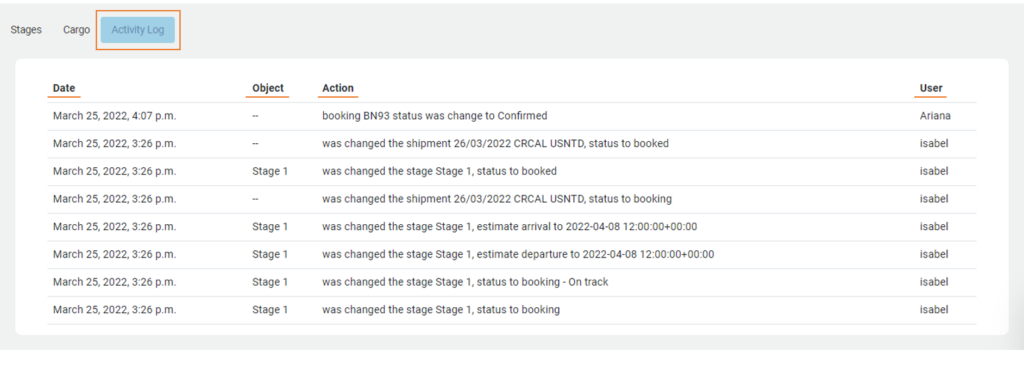
In Activity Log you will see the record of every change or update that the users related with this shipment make.
Once the status of your Booking is confirmed, you will see that the system generates automatically a Booking number to send to your client by email.
- Otherwise, if you client is missing any document or information required to continue with the process, an option of request documentation will be displayed
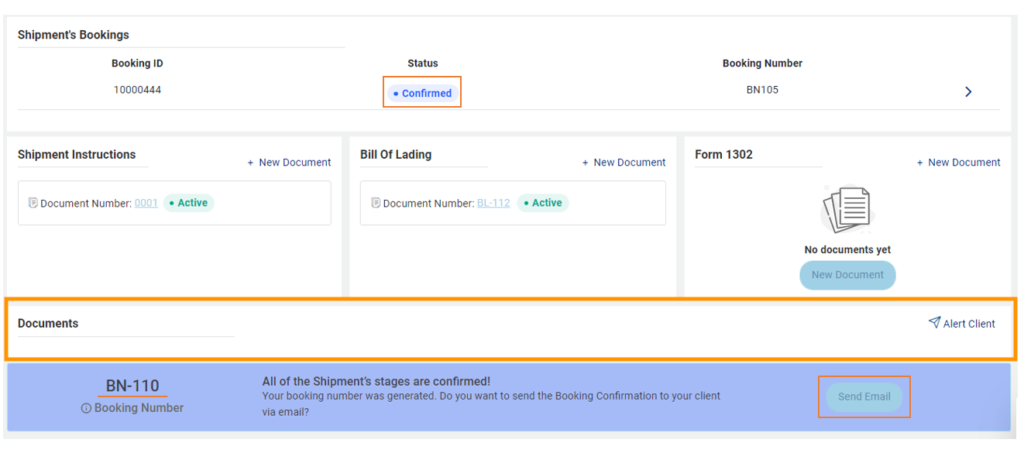
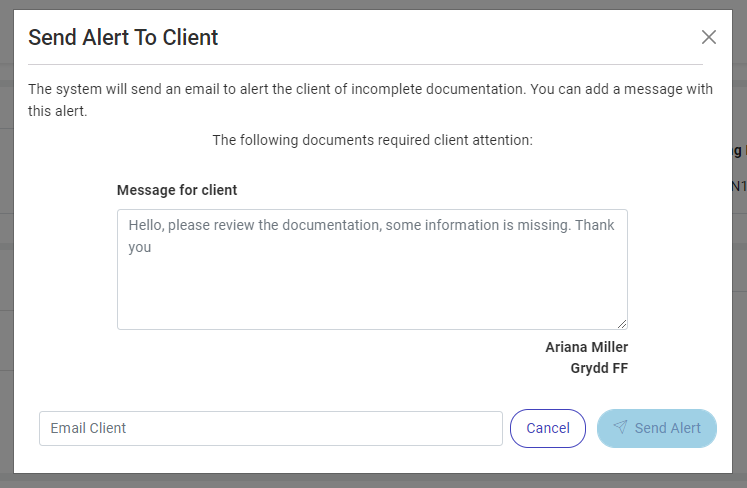
When all the documentation is complete, click on the button “Send Email” and the client will be able to see it in his email.
Email received by the customer:
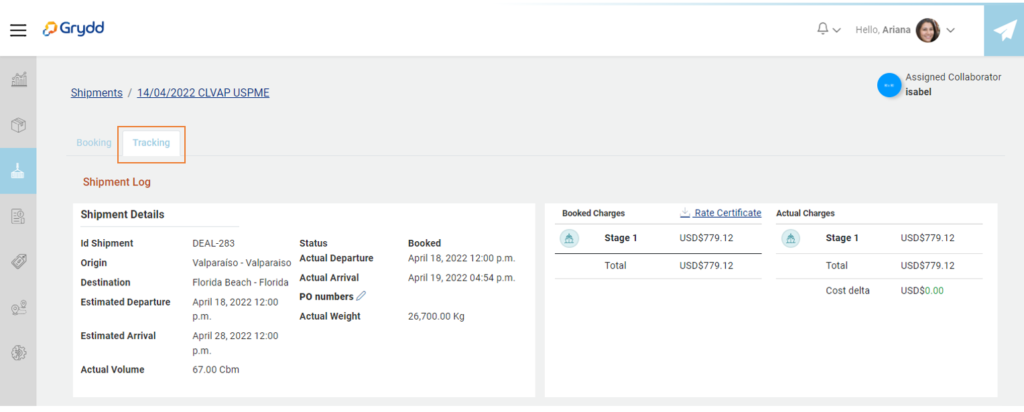
- Once your booking is completed, you can go to the next view “Tracking”.
- Here you will find all the information of your shipment. Dates, IDs, Route, Cargo, Containers, assigned collaborator, charges, Documents, Collaborators for the whole shipment and Activity.
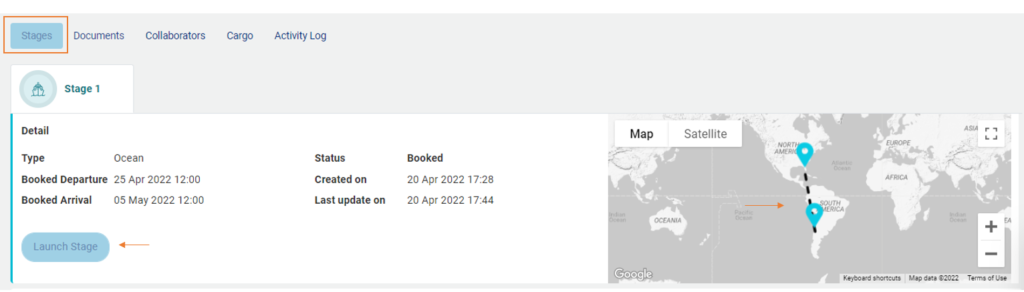
Stages
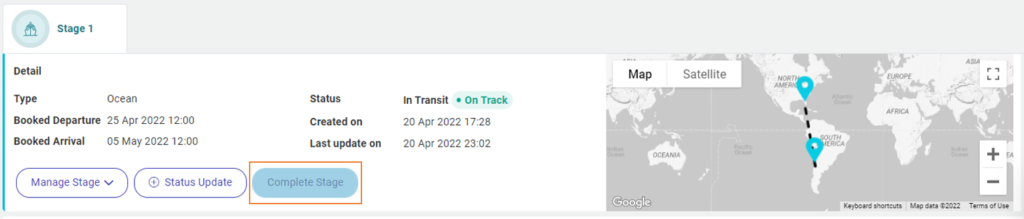
You will see the route information and a map on the right that once the shipment is in transit the system will show you pins on the map to see where the vessel is.
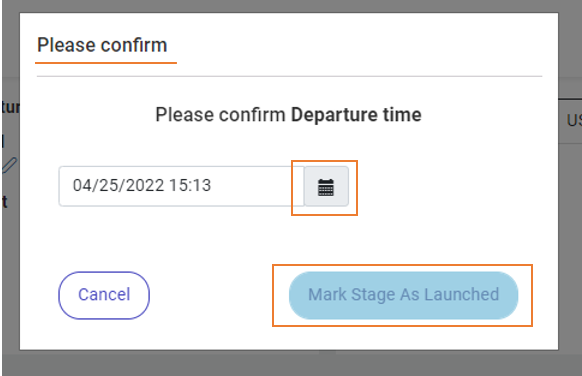
To Launch a stage manually, just click on the button “Launch Stage” and select the date.
If you do not do it manually, the system will launch it automatically.
- Once the stage is launched you will see new buttons that will help you to manage your shipment.
- And in the map, you can see the route (blue pins, origin, and destination) and the purple pin is the position of the ship.
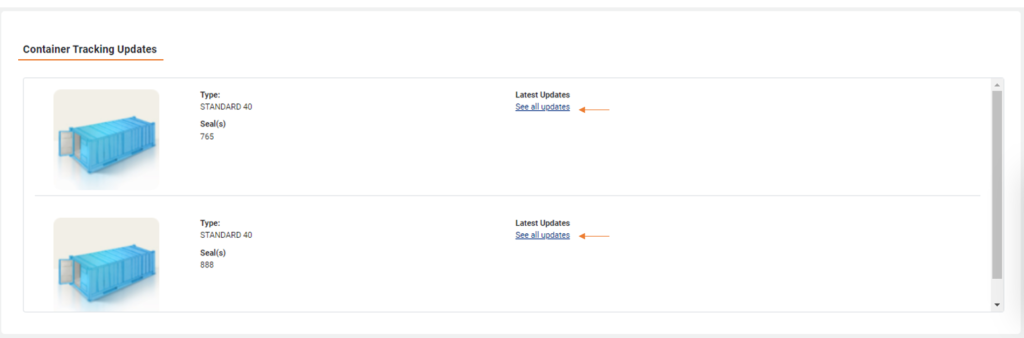
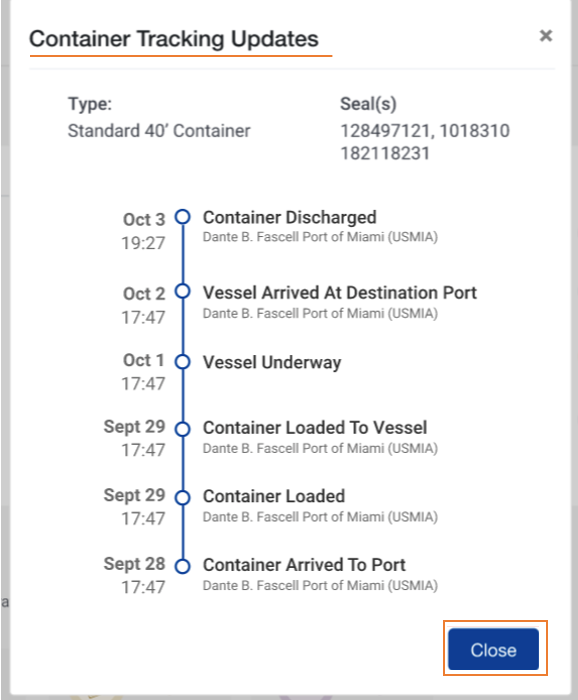
You will see Container Tracking Updates, if you click on the title “See all updates” the system will open a modal, showing you all this updates.
- At the bottom of this view, you will see more information like Dates, Transport, Addresses, Charges, Documents and Current Estimate Position.
- Click on the title of each one and it will drop-down more information.

Documents:
Create a new document clicking on the button “Create new”.
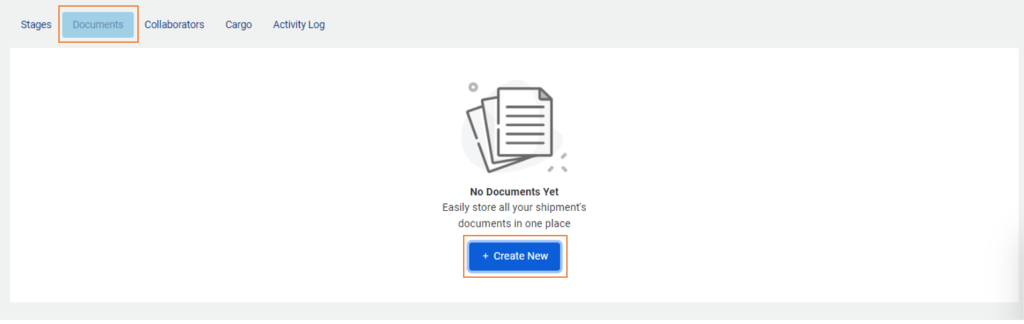
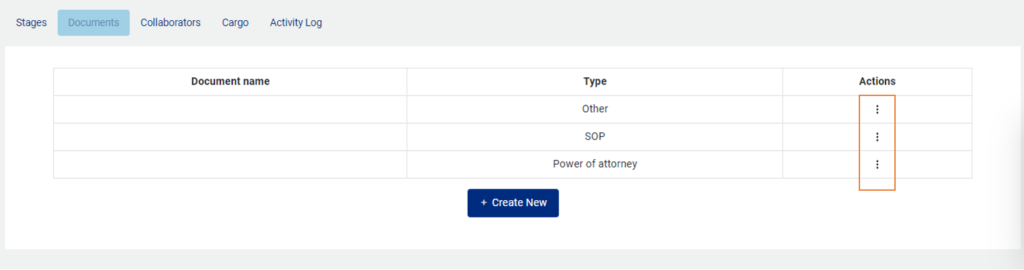
- Here you will see all the documents attached to that specific shipment.
- You can click on the kebab menu and see the option.
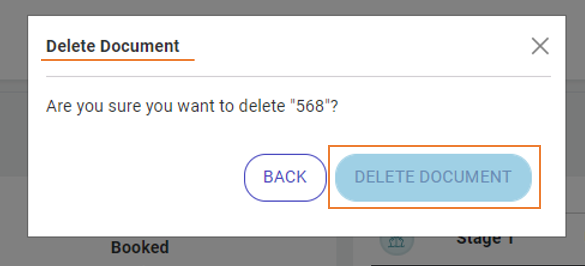
You can delete your document.
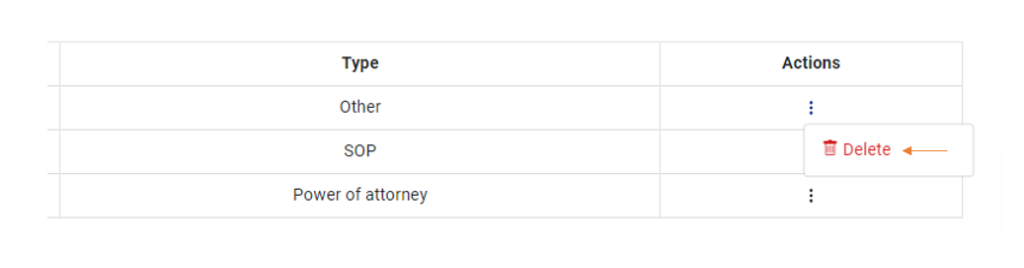
The system will open a modal for you to confirm the elimination of the document.
Collaborators:
You can see the Seller/buyer, add a receiver, consignee / importer of record.
After every change you make, select save.

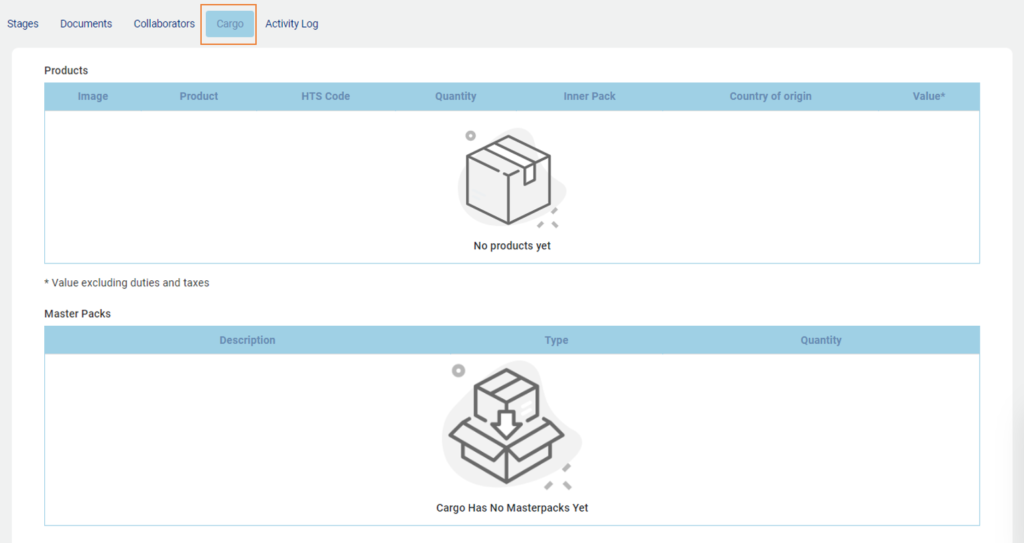
Cargo:
You will see Products related with that specific shipment, Master Packs, Pallets, Cargo Details, Container Details, and the Total.

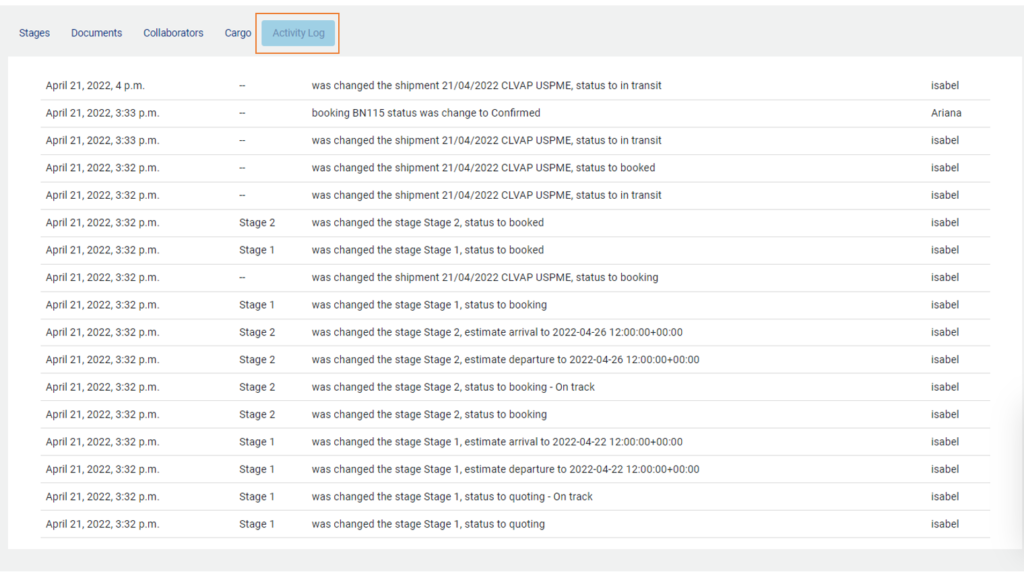
Activity Log:
You will see the record of every change or update that the users related with this shipment make.
Have questions? Please get in touch via chat. We reply usually within minutes.
Grydd – Fast forward your logistics
Leave a Reply
You must be logged in to post a comment.